Assignment 2: Steganography (16 pts)
Due Wednesday 2/19/2020
The purpose of this assignment is to get students practice with multidimensional arrays in Python representing images. Please visit this link to get the starter code for this assignment. You will be editing the file Assignment2_Steganography.ipynb. This file actually has very little in it; it just has the imports you need. You will be writing the bulk of the code in this assignment based on notes from class.
Part 1: Alpaca Tunes (8 Points)
Steganography refers broadly to the process of hiding one data stream inside of another. In this assignment, you will explore an application of steganography in which audio data is hidden in the RGB values of pixels in an image. Below are two images of an alpaca taken by my cousin Allie Mellen:
alpaca.png |
alpacastego.png |
 |
 |
-
First, load the image
alpacastego.pnginto a variable. To make sure you've done this properly, the shape of this variable should be (512, 512, 3); that is, it's a 512x512 image with three channels for red, green, and blue. - Next, extract the red channel and flatten it into a 1D array, which you should store in another variable.
-
The audio is hidden in the "two least significant bits" of the flattened red channel; that is, the audio is what you get after you divide each element in the array by 4 and take the remainder. You can do this with the
np.modcommand, as we have done for triangle waves. If you forget how this works, typenp.mod?in a cell and run it, and this will bring up the help menu. - Finally, play the audio that you extracted after taking the remainder above. You can assume the sample rate is 44100. Look back at the audio processing assignment to see how to play audio in Jupyter with a particular sample rate. If this worked properly, you should hear a clip from song. Otherwise, you will hear static. Make a note of the song you hear in the notebook.
- Repeat steps #2-4 for the green and blue channels.
Part 2: I Have A Dream (8 pts)
Below is an image of Martin Luther King Jr, saved in the file MLKStego.png:
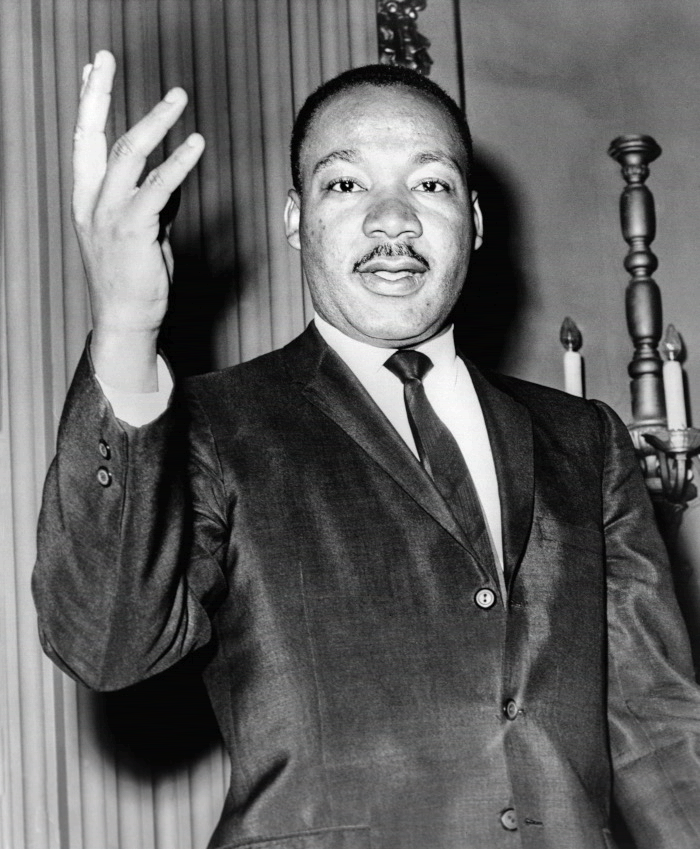
Hidden in this image is a 38 clip of a lesser known part of his "I Have A Dream" speech, but one which highlights one of his key tenets of his philosophy on activism. A third of this clip has been hidden in the red channel, a third of it has been hidden in the green channel, and a third of it has been hidden in the blue channel, not necessarily in order.
As with the alpaca example, you can obtain each audio segment by flattening the pixels into raster order and taking the remainder after dividing by 4, and you may assume the sample rate is 44100hz. However, you will need to do one more step to re-assemble the pieces into one contiguous chunk of audio. Numpy's builtin command concatenate can help you do this. For instance, the code
will create an array xyz that starts with the samples in x, followed by the samples in y, followed by the samples in z, for an array with the elements
[1, 2, 3, 4, 5, 6, 7, 8, 9].
NOTE: The code above is just an example of how to use np.concatenate; you will be replacing the variables x, y, and z with your own variables.
Please show the code to extract and re-assemble the audio, and please transcribe what you hear into text in a markdown cell in your notebook. You may want to Google the "I Have A Dream" speech to make sure you're putting the segments in the right order.
Extra Credit: Hiding Audio (+5)
As a fully optional extra credit task, hide your own audio in the red, green, or blue channel of some image. To ensure it works, you should start from scratch with the steps above to make sure you can extract it. Hiding audio is much harder than extracting it (which is why this is extra credit), but here's a rough list of steps you can follow to do try:
- Load in some audio, and quantize it to the range 0-3. You can do this with a careful use of the
np.roundcommand. -
Once the audio has been quantized to this range, cast it as a
uint8type, which it needs to be to be added to an image channel. For this discussion, let's say the audio is in a variablex. You'd do this withx = np.array(x, dtype=np.uint8). -
Next, pull out one of the channels from the image, and flatten it into a variable. For this discussion, let's call that variable
y. Subtract from every sample ofythe remainder after dividing that sample by 4. Then, addxto the firstx.sizesamples ofy. -
Finally, reshape
yto be the dimensions of your image, and overwrite the channel you extracted it from withy. Typenp.reshape?for help on this command. As an example, if your image is 100x100, a flattenedyis an array of 10000 samples. You'd reshape it by typing
y = np.reshape(y, (100, 100))
What to submit
When you are finished the above tasks, please submit your Assignment2_Steganography.ipynb file to Canvas. You should have a sentence describing each of the three audio clips in the notebook. Please also submit a README with the answers to the following questions:
- Did you work with a buddy on this assignment? If so, who?
- Approximately how many hours it took you to finish this assignment (I will not judge you for this at all...I am simply using it to gauge if the assignments are too easy or hard)
- Your overall impression of the assignment. Did you love it, hate it, or were you neutral? One word answers are fine, but if you have any suggestions for the future let me know.
- Any other concerns that you have. For instance, if you have a bug that you were unable to solve but you made progress, write that here. The more you articulate the problem the more partial credit you will receive (fine to leave this blank)